I thought it would be fun to share this small woodworking project. In this modern society we personalize our phones, our vehicles, our computers, our … usb sticks? I think this is a cool and unique way to express yourself while also improving your carpentry skills. Imagine showing up with a polished Wooden USB Drive that you created yourself, it kind of says something about your character, eh?
So before you start this project you’ll need the following things:
- A USB Drive (obviously)
- A saw (a smaller and finer saw will make this easier)
- A chisel
- Sandpaper
- Drill
- Beer? (optional)

Step 1: The Flash Drive
As you can see the flash drive in this picture is without the metal sleeve or any type of support. If you have a metal sleeve or the flash drive already has some type of sleeve, you can skip this step. Adding a thin support will also help the USB drive to fit into the USB port.
Clamp a piece a wood and use your saw to cut the length of the drive (and the width). The thickness should be roughly double the USB drive. After you sand it for uniformity it should be the right size. As you can see in the pic below, it’s not completely uniform but sanding it anymore might break the piece.

Step 2: Preparing the Housing
Before you cut out the size of your block, you’ll want to cut the recess out for the USB drive. If you do this step after, you might snap a piece off since the wood will be thinner. Measure the width of the drive (or you can take the drive and trace it), then score the lines with your chisel. Lightly tap with a mallet or apply pressure. For the length of the recess, it’s important that the USB Drive fits all the way into the computer, so don’t make the recess too long.
Step 3: Cutting the Block
Now that the recess is made for the USB Drive, you can cut out the width of the block. In this case, just a little wider than the drive itself, but it really depends on how you want it to look. After using the saw, sand it down so that the top (where you’ll insert the drive) and the bottom are parallel. You’ll cut this wooden piece in half lengthwise, then you can place the other half on top so the drive is in the middle.

Step 4: Gluing and Shaping
Now you have the two wooden halves, you should sand them out and shape them how you want. You can glue them first with the drive in, but I didn’t want to take the risk of breaking anything. Clamp the two pieces with glue and let it sit for awhile. After it’s dry, you can use a higher grit sand paper to make it look nice and round it out further (if that’s what you want).
Step 5: Drilling and Polishing
Lastly, you need to drill the key ring hole. When drilling be careful not too go too fast, and start with a small drill bit. You don’t want to break anything right at the end. You can also sand the key ring hole to give it a more rounded look. And now for the finish. There are different ways to finish the wood. For this item, boiled linseed oil was used. Hell, you could even use varnish if you want.
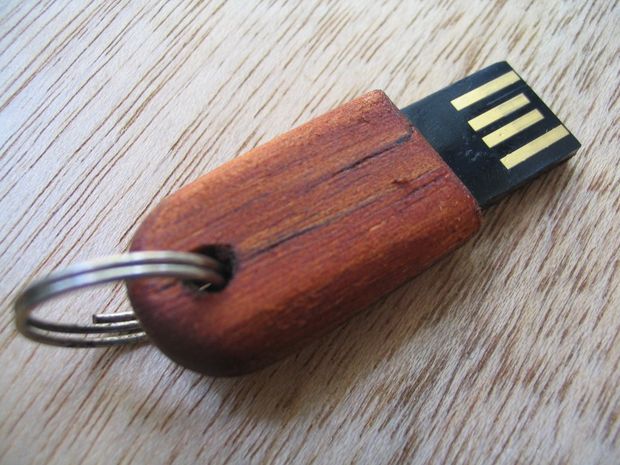
That’s it, now you have your own Wooden flash drive! Hope you enjoyed this small wood project! If you have any comments, or suggestions on how to do things better, let me know in the comments. Follow along and bookmark as I’ll be going through various DIY projects, woodworking plans/ DIY wood projects.
Other Woodworkers: Here’s some other wooden USB sticks projects that users created. Have some pictures you want me to add? Contact me and I’ll add your pictures to the blog.
